Category Archives: Jams, jellies, marmalades

Plum, Prune and Chocolate Jam

chocolateplumjamp

First of all, I would like to apologize for my long silence and the absence of new posts during the past week. I went on an unexpected, last-minute trip to Japan and hardly had the time to pack my luggage correctly. Those of you who know for how long I had been dreaming about visiting this country will probably understand why I have completely lost my mind there and wasn’t able to follow my beloved blogs, not to mention posting. I hope you will all forgive me. Even though I did take some photos during this wonderful stay, I don’t have as many as I wanted (on the other hand isn’t our brain the best photo album in the world?) and certainly not enough to make a whole post about Japan. As soon as I find my camera battery charger, I will see if I can share with you at least a couple of the food-related ones. In the meantime I will be trying to catch up with all your posts I have missed and would like to share with you an unusual, wonderful preserve I discovered just before I left for Tokyo.

Even though it’s hard to believe, this unappetising jar contains a highly palatable jam. Plum and chocolate jam has been quite popular on internet several years ago and as a huge fan of both plum jam and chocolate I bookmarked this idea and then forgot about it. A couple of weeks ago I noticed this original version of Plum and Chocolate Jam by my inspiring friend Bea, who also lives in Switzerland and who I greatly admire for both culinary skills and extraordinary photographs.  I made a small batch almost instantly and even though my jam looked much less appetising than hers, the result was stunningly good. Bea calls the jam “prunes in chocolate” and if you have ever had this sweet snack I personally go crazy for (see here my 10 minute recipe), you must test this recipe too.

The unusual mixture of sweet, sour and bitter flavours will not please every palate (my husband said he preferred the real Nutella ;-) ), but for tangy and dark chocolate dessert fans like me it is a real feast. I think this jam would be excellent on buttered toast, but also as a versatile cake, biscuit or cookie filling. Plums are invading market stalls now and I already now that apart from the Plum Butter I prepare every year, I will fill my pantry with another batch of this delicacy. I have slightly modified Bea’s recipe, adding more rum and skipping the spices (ginger, cinnamon and cloves), so feel free to add them for a more complex flavour. Thank you so much, Bea, for this extraordinary recipe.

If this Plum and Chocolate Jam doesn’t sound inspiring, you might like the Damson Plum Butter, the extraordinary, rich taste of which has got nothing to do with standard plum jam:

And if you look for a quick and delicious (and rather healthy) sweet snack, try the ridiculously simple Prunes in Chocolate:


TIP: The best plums to use here are long, dark violet (purple) or dark blue plums, of damson variety or similar. They should have aromatic, dark skin and dark yellow flesh.

Preparation: 2 days

Ingredients (yield: about 4 x 200 ml/7 oz jars):

20 prunes (without stones)

50 ml (about 1,7 oz) rum + 50 ml hot water

2 kg (about 4,4 pounds) long, violet/purple/dark blue plums

50 g (about 1,8 oz) good bitter chocolate

5 heaped tablespoons cocoa

sugar (at least 600 grams; the amount depends on your preferences and the plums’ sweetness)

(50 ml/about 1,7 oz rum)

Cut up the prunes into pieces and soak in rum and hot water overnight.

The following day  wash the plums, stone them and put in a big pan. Add the prunes and their soaking water.

Add some water (about 10% of the fruits’ initial weight), so that they don’t stick to the bottom until they start releasing their juice.

Put the pan on a low heat and let it simmer, stirring occasionally. First you can stir every 30 minutes, but when the mixture thickens, you should lower the heat to the absolute minimum and stir it every ten minutes. The thicker the mixture,  the more often you should stir it.

If the pan burns, quickly transfer the unfinished butter to another pan (otherwise it will “take” the burnt flavour).

After about two or three hours add the minimal amount of sugar.

Simmer the jam for about 30 minutes and add more sugar if needed (and simmer for 30 more minutes, constantly stirring).

30 minutes before the end add the cocoa and the chocolate and let the mixture simmer, constantly stirring. Add more rum if you want (I thought rum was a perfect flavour enhancer here).

If you want, you can quickly mix the jam in a food processor, so that it has a smooth, spread-like consistency. (I did it).

/At this point you can either freeze it (after the jam has cooled down) or keep it in the fridge for a couple of weeks, or process it in the jars, as described below, and store it in your pantry for at least a year./

Pour the jam, still hot, into sterilised jars. Cover with lids. Leave the jars to cool.

Place the cool jars in a big pan, bottom lined with an old kitchen towel folded in two (this will prevent the jars from breaking), cover up with hot – but not boiling – water to the level just below the lid. Bring to boil and keep on a very low heat, in simmering water, for around 20 minutes.
Stick on self-adhesive labels, write the name of the jam and don’t forget to mark the date.


Wobbly Rhubarb Delight

wobblyrhubp

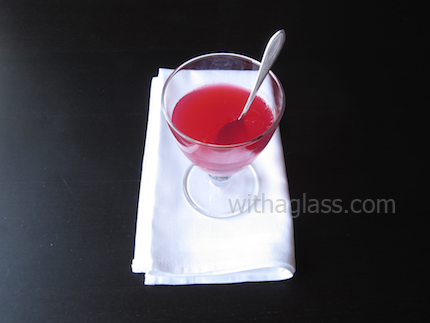
Jelly is not the only dessert that can be described as “wobbly” and the above is the best example. Even though I am not a fan of standard, well set, thick jelly, I have literally fallen in love with this light, barely set dessert I decided to call Wobbly Rhubarb Delight. Its unusual, “falling-off-the spoon” consistency was achieved thanks to a reduced amount of agar (see below), just like in my previous experiments with this gelling agent.

For those who haven’t read about my recent adventures with this product, agar (agar-agar, “kanten” in Japanese) is a gelling agent very popular in Asia, but it is not a gelatin substitute. It is prepared in a slightly different way and, most of all, gives different textures and consistencies. In Europe it is widely used in food industry and is quite popular among vegetarians, since agar is produced from seaweed (not bones, like gelatin). Apart from its gelling properties, agar has considerable health benefits. It helps digestion and is often consumed as a slimming diet booster. A Japanese friend has confirmed what I had already read about: in her country some women dissolve it in tea to help digestion and to suppress appetite (I haven’t checked if it works on my appetite though).

In short, not only this dessert is delicious, light and refreshing, but it is healthy too. To prepare it I used the Soft Rhubarb Drink I wrote about recently (see the recipe here) and then simply proceeded like with my other agar desserts, i.e. adding less agar than advised on all the packages and in all recipes in order to obtain a looser consistency. After two hours in the fridge I obtained an amazingly refreshing, elegant, tangy and sweet treat, with a subtle rhubarb aroma. Apart from ending a meal, it could be served as a palate cleanser or even a cooling drink substitute (it is an excellent thirst quencher).

The below recipe includes the Soft Rhubarb Drink preparation, so if you already have it, skip the first, rhubarb cooking, stage and simply measure 500 ml (2 cups and 2 tablespoons) to use in this recipe.

In case you are interested in other desserts using agar, until now I have written about:

-Light Coconut Cream with Canned Peaches

-Light Chocolate and Coconut Cream

TIPS: Look closely at your agar package instructions. On mine 1/2 teaspoon is said to set 500 ml/2 cups liquid to a jelly. I use only 1/3 teaspoon and obtain a wobbly, “falling off the spoon” consistency. If you prefer a well-set jelly, use the amount advised on the package.

Since water evaporates during the first (rhubarb cooking) stage and rhubarb absorbs some water too, it is difficult to say how much liquid you will obtain. You need only 500 ml (about 2 cups) for the recipe (at least for the below amount of agar), so simply measure it and drink the rest!

I like very tangy desserts, so I have added only 1 heaped teaspoon sugar per portion, but feel free to double or triple it before the setting process, gradually tasting the result (a certain tanginess should remain, otherwise it will turn into a bland, tasteless dessert).

TIPS: Rhubarb leaves are poisonous, so before you start cooking it, cut off and throw away every single trace of leaves, sometimes left on the stalks.

Do not wait until the liquid becomes cold before pouring it into serving glasses because agar sets at room temperature and once disturbed, it will not reset properly!

Preparation: 1 hour+2 hours in the fridge

Ingredients (yields 4-5 portions):

250 g (8.8 oz) rhubarb stalks

700 ml (almost 3 cups) water

4  or more heaped teaspoons sugar (a sweetener can be used too)

1/3 teaspoon agar in powder

Cut up the rhubarb and put it into a big pan with water.

Bring to boil at medium heat and cook until the rhubarb completely softens (starts falling into pieces).

Put aside and wait until the rhubarb drink cools down.

Strain it.

Measure 500 ml (about 2 cups) of the liquid (the rest can be put into the fridge and used as a soft drink).

Add the sugar gradually, increasing its amount to suit your taste and the rhubarb’s acidity (some rhubarb varieties are less acid).

Pour it into a pan, add the agar and stir to dissolve both agar and sugar.

Bring to boil, stirring, lower the temperature and let it simmer for about 1 minute constantly stirring.
Transfer into serving glasses or bowls and when the dessert has cooled down, refrigerate for two hours.

It can be served with whipped cream if you like it.


Light Lemon Curd

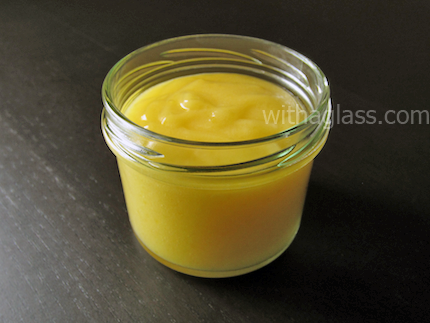
When Charles (Five Euro Food) and then A_Boleyn posted Lemon Curd recipes I thought it was high time I presented a lighter version, which might please all those, who, like me, prefer sharper and more intense lemon desserts. I must have heard of lemon curd for the first time a long time ago, but given the amazing rapidity with which I was able to empty a butter- and sugar-loaded jar, this delightful spread was one of the rarely enjoyed sweet treats. When I finally tested its low-fat version I quickly forgot this was a lightened lemon curd and have never come back to the traditional version. In fact, the drastic reduction of fat has resulted in a more intense, sharper and, I would even say, more elegant flavour. (It was a bit like discovering Alain Ducasse’s half-cream, half-milk Crème Brûlée, which has put me off the 100% fatty cream, traditional version forever).

After several batches I slightly modified the original recipe (adapted from this fantastic Polish baker’s blog). I added a small amount of butter instead of the advised oil (I missed a touch of buttery flavour) and found a foolproof and easy method of getting rid of lumps (see below). I have also made this lemon ultralight, partially substituting the sugar with a special cooking sweetener (I wouldn’t advise however substituting all the sugar with a sweetener: the texture is not the same and it simply tastes worse).

Lemon curd is fantastic on any type of sweet biscuit, on toasted bread, on a slice of yeast cake, challah, but it’s also an excellent tart, pie, cake or cookie/biscuit filling (see for example Thumbprint Almond Cookies). It is of course irresistible on its own, eaten directly from the jar.

TIP:  Start with 12 tablespoons sugar and add more, if needed, after the curd has thickened.

Preparation: 15 – 20 minutes

Ingredients (yield: one 300-350 ml jar):

juice from 3 lemons

zest from 1 lemon

12 – 15 tablespoons castor sugar (or 10 tablespoons sugar + 5 tablespoons cooking sweetener which is usually sweeter than sugar)

2 eggs

1 flat tablespoon cornstarch (or potato starch, but cornstarch gives a lighter result)

1 heaped tablespoon butter 

Mix everything in a blender, apart from the butter.

Pour into a small pan, add the butter and warm at low heat, constantly stirring, until it thickens.

Taste and add more sugar if needed. Stir well until the sugar/the sweetener dissolves.

Put into a jar, close the lid and let it cool down.

Keep in the fridge for up to two weeks.

Serve on toast, bread, use it as a pie or a cake filling (it is delicious in the Thumbprint Almond Cookies).

Damson Plum Jam and Chocolate Tart


I crave chocolate all year long, so even though it’s springtime and I start dreaming about light fruit desserts, I still make sure I have some dark chocolate in case I feel an urgent need bake something with it. I also adore tart desserts, so when I saw Stevie Parle’s damson and chocolate tart on the Telegraph website, I thought it was a perfect combination of both. Moreover, this tart reminded me of one of Prunes in Chocolate, my favourite quick chocolate snack.

I decided to make this tart several days ago when I realised  that even though I offer jars regularly to my friends and family, I have almost no free space for this year’s preserves. My favourite jam is thick damson plum jam  (damsons are oval violet plums with a tangy skin and yellow flesh) called “butter” and slowly cooked without sugar addition. (I have posted the Damson Plum Butter recipe here). Thanks to its tanginess and deep, slightly smoky flavour, damson plum jam is excellent with both savoury and sweet dishes and, as I have recently realised, also with dark chocolate.

Instead of following S. Parle’s complicated recipe, I have made my foolproof shortcrust pastry and filled the tart with a modified version of Joël Robuchon’s chocolate tart filling (found in Le Meilleur et le plus simple de Robuchon). For me this easy, rich, tangy and intensely chocolatey tart was an amazing discovery, but I would advise it only for those who  are big fans of bitter chocolate and who prefer moderately sweet desserts.

TIPS: This tart is an excellent way to use up an opened jam jar (or last year’s preserves). Any thick jam will be good in this recipe, but in my opinion sour cherry, strawberry, raspberry or apricot jam would be the best.

I strongly advise home-made shortcrust. Its thin, buttery, crunchy layer cannot be substituted with any ready-to-use crust. However if you use a bought one (about 230-240 g), make sure it’s rolled out very thinly and that it’s made only with butter.

Special equipment:

beans for blind baking (I have been using the same real dried cheap beans for several years now)

Preparation: 2 hours

Ingredients (makes a 28 cm diameter tart):

Shortcrust (or 230-240 g of ready-to-use thin, 100% butter shortcrust pastry sheet): 

125g flour

90 g softened butter

1/4 teaspoon salt

3 tablespoons caster sugar

Filling: 

300 ml tart thick jam

200 g dark good quality chocolate (more than 72% cocoa)

250 ml liquid cream

1 big egg

Prepare the shortcrust.

Mix the butter, the salt and the caster sugar in a food processor. When these ingredients are mixed thoroughly, add the flour and mix again.

Stop when you see a big ball is being formed.

(You may also knead the pastry without the food processor, but then you have to do this very quickly, maximum 5 minutes, pushing with the heel of your hand and minimising the use of your fingers, otherwise the tart will be too crumbly.)

Wrap the dough in a cling film and put into the fridge for at least 30 minutes (you can leave it there up to 48 hours).

Take it out of the fridge and let it soften a bit before  using it.

Roll it thinly with a rolling pin (I would advise 3 mm) and line a greased tart dish or spread it with your fingers without rolling if you find the rolling process difficult.

Put back into the fridge for about 15 minutes.

Preheat the oven to 150°C.

Take out the tart dish from the fridge.

Cover the flat surface with a baking sheet and put some dried beans on it. This way the pastry will not rise.

Precook the tart shell until it’s no longer raw, but still white (it will take 10-15 minutes).

In the meantime prepare the chocolate filling.

Break the chocolate into small pieces.

Bring the cream to boil and pour over the chocolate, stirring quickly until the chocolate melts and forms a homogenous ganache.

When it cools down and is no longer hot, add the egg.

Take the blind-baked shortcrust out of the oven, put the beans back into their jar and let the tart shell cool a bit.

Cover the tart shell with a generous layer of thick jam and then pour the chocolate filling on top.

Bake for about 15-20 minutes until the chocolate filling is set.


Apple and Apple Sauce Tart

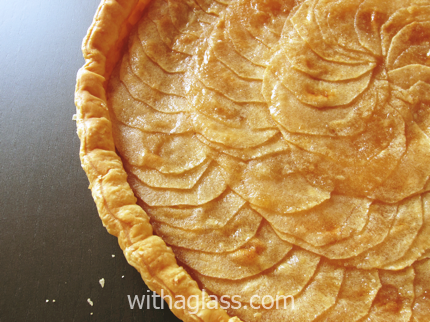
A couple of days ago, when I started to get bored with the umpteenth jar of Apple Sauce, I decided to look for a new light apple dessert recipe. I decided to make an apple tart from the famous Joël Robuchon’s cookery book (Le meilleur et le plus simple de Joël Robuchon). Imagine my surprise (and pride!) when I noticed that his idea was very similar to what I thought I had invented a couple of weeks ago when making a plum tart! For those who don’t remember, I was very proud of the result obtained with with a combination of plum butter and raw plums. Here, in Robuchon’s recipe, a layer of apple sauce is covered with thin raw apple slices.

This tart is what the French call “Tarte Fine”, i.e. very thin (mine was maybe 1,5 cm thick), with a very thin layer of fruit and usually without a border (I didn’t have a bigger baking dish, so my border was simply lower than usually). Thanks to the combination of apple sauce and raw apples, the flavours are surprisingly complex and the difference in three textures particularly enjoyable. (I also particularly liked this tart because it forced me to buy an apple core remover, one of the kitchen gadgets I didn’t own.)

The only arduous parts here might be cutting very thin apple slices and removing cores. Both can be very quick and simple if you have a mandolin and an apple core remover. If, like me, you have very good apple variety (I used here King of the Pippins, or “reine de reinettes” in French), you don’t need to add any spices. If your apples are slightly bland and lack aroma, add some vanilla. (The below recipe is slightly modified).

Special equipment:

apple core remover

mandolin

Preparation: 1 hour 30 or 2 hours if you make the apple sauce from the scratch

Ingredients:

1 puff pastry sheet (rolled out very thinly, e.i. about 3 mm)

7 apples (for the best aesthetic result they should have more or less the same size) + 3 tablespoons sugar , or 200 ml sweetened applesauce + 4-5 apples

2  tablespoons confectioner’s sugar

2 tablespoons caster sugar

a couple of tablespoons melted butter

(2 vanilla pods)

If you are making apple sauce, peel and core 4 apples, cut them into small pieces, add the grated vanilla grains, the sugar, 3 tablespoons water and let them simmer on a low heat until they fall into pieces and form a sauce.

Preheat the oven to 180°C. Line a greased (or lined with baking paper) baking dish with puffed pastry.

Pick the surface with a fork, cover with aluminium foil or baking paper covered with dry beans (so that the pastry doesn’t rise too much) and blind bake it (until the pastry is firm but still white).

Spread the apple sauce on the tart crust.

Peel the remaining apples, core them and slice very thinly with a mandolin or with a knife, but the slices shouldn’t be thicker than 2 mm.

Arrange the slices on the apple sauce, overlapping each other, so that both the apple sauce and the central hole are covered.

Brush the tart with melted butter, sprinkle with 2 tablespoons caster sugar and bake until the apple slices start browning.

Take out of the oven and just before serving sprinkle once more with confectioner’s sugar and put under the grill/broiler (watch it constantly since it’s very easy to burn!).

Serve hot  or warm (it tastes great with vanilla ice-cream).

Pear Sauce with Prunes

I have been making apple and pear sauces for years. Both fruits are cheap and easy to works with since no peeling is involved. Fruit sauces can be eaten straight from the jar, served on buttered bread, but they are also excellent as tarts and cookies fillings and as I have recently learnt, also as an egg substitute (click here to see a delicious Eggless Applesauce Cake recipe). I don’t remember how I had this idea, but probably one day I got bored with the pear sauce I had been making for years, saw a jar of prunes whiles reaching for the sugar and decided to experiment. The result was so satisfactory, I simply stopped making other pear sauce versions and prunes have become the obligatory ingredient of my pear sauces.

Even though both prunes and pears have strong flavours, neither of them gets lost in this combination. The sweetness of the pear is completed by a slight tanginess of the prune creating a harmonious final taste. With their fiber, vitamins and other health benefits prunes add a healthy accent to this sweet treat.

Before I pass to the recipe details, I would like to thank Stefanie from A Dash of Sugar and Spice, Shannon from Just as Delish and Charles from 5 Euro Food for the Versatile Blogger Award I have recently got from all of them. I feel honoured to get this triple (!) award.

The Award has two rules. The first one is to say 7 random things about oneself that others might not know and the second one is to pass the award to 7 other bloggers. I found it very hard to think of the things which might be interesting and hope the following random facts don’t make you yawn:

1. I used to be a vegetarian for a year when I was 16 or 17. The smell of my mum’s roast chicken made me quit.

2. I used to be a huge Depeche Mode fan as a teenager and still love listening to their old songs sometimes. Their concert last year was one of the most moving moments of the past several years of my life. Of course this one is among my favourites (althought this is not my concert):

UPDATE: Apparently (thank you, Nami!) the above video doesn’t work in the US, so I hope the below non-live version can be viewed worldwide:

3. I have recently started to love harpsichord (which used to irritate me) and the late Scott Ross’s interpretations not only give me goose pimples, but some bring tears to my eyes.

4. The only book I have read at least ten times (and which still makes me laugh) is The Secret Diary of Adrian Mole, Aged 13 3/4 by Sue Townsend.

5. At the age of 13 I knitted four wool  jumpers and actually wore them. Two of them were quite complicated (one had a very kitsch Mexican desert landscape with cactuses and sunset…). I still don’t know how I did them or how I dared wearing them.

6. I am a Hungarian folk music fan. It makes me happy and sad at the same time.

7. I am not ashamed to say I love South Park. Eric Cartman rocks! Click here to see one of my favourite Eric scenes.

Ideally I would love to be able to pass the Versatile Blogger award to all the authors whose wonderful blogs I follow and who are my teachers and my constant inspiration. Some of my blogging friends have already been nominated, which is a good thing, because even without them, I find it difficult to put only 7 names. Anyway, here is the list of seven (oops,eight) out of many bloggers I admire and find exceptional (I am sorry if some of you have already been nominated):

Arudhi from A box of Kitchen

Jeno from Weeknite Meals

Kelly from Inspired Edibles

Miss Iona Lion from Twice Bitten

Mr. Three-Cookies from Three Cookies

Ray from Wok with Ray

Shilpa from Baking Devils

Shu Han from Mummy, I can cook!

Now back to the recipe.

Preparation: about 2 hours

Ingredients:

2 kg pears

100 g prunes (without stones)

500g-1 kg sugar (depends on the pears’ sweetness and your own preferences)

juice from 1 big lemon

Wash the pears, chop them roughly into four-five pieces and put them in a big shallow pan.

Pour a litre of water, cover the pan and cook at medium heat until the fruit is well cooked and almost falls into pieces.

In the meantime mix the prunes in a food processor or chop them very finely.

Pass the cooked pears through a food mill, transfer into a big pan.

Add the lemon juice, the sugar, the prunes and cook, stirring around 15 minutes or until the sugar is dissolved and the sauce starts boiling.

Taste if the sauce is sweet enough, add more sugar if needed, cook for 30 more minutes, stirring from time to time.

/At this point you can either freeze it (after the sauce has cooled down) or keep it in the fridge for a couple of weeks, or process it in the jars, as described below, and store it in your pantry for at least a year!/

Pour the sauce, still hot, into sterilised jars. Cover with lids. Leave the jars to cool.

Place the cool jars in a big pan, bottom lined with an old kitchen towel folded in two (this will prevent the jars from breaking), cover up with hot – but not boiling – water to the level just below the lid. Bring to boil and keep on a very low heat, in simmering water, for around 20 minutes.
Stick on self-adhesive labels, write the name of the sauce and don’t forget to mark the date.

NOTE: For the readers who live in the USA, the USDA-approved canning method is different. You can find it described here:
http://www.uga.edu/nchfp/publications/uga/using_bw_canners.html.

Eggless Applesauce Cake

As soon as I saw a Low-Fat Banana Bread on Jeno’s blog (Weeknite Meals) I thought it looked and sounded very similar to the Applesauce Cake I make. I promised Jeno I would post my recipe and I hope she will forgive me for being so terribly late!

I have found this recipe in Boston Cooking-School Cook Book by Fannie Marritt Farmer, an excellent book I have bought at second hand book sales, unconscious of the treasures I would find there. It might not be the most appealing source of recipes (especially my old edition), but everything I have tested proved fully successful. (If you don’t cook often from books, believe me, foolproof cookery books are rare jewels…). Another recipe from this book I posted some time ago are the fabulous and easy Deep-Fried Scallops.

Apart from being sticky, moist and flavoursome, this cake has several big advantages. It is very simple and quick to prepare. It doesn’t requite any eggs or fresh fruit, so it can be made with your pantry’s permanent stock all year round. You will also be surprised to see it keeps fresh for ages, especially if refrigerated. Since it’s best very soft and moist, I prefer it served straight away from the fridge, anyway.

Preparation: 1 hour

Ingredients:

120 g  butter (about 1/2 cup); I often reduce this amount to 50 g butter

250 ml (1 cup) unsweetened applesauce + 200 g (1 cup) sugar, or sweetened applesauce + 100 g sugar (1/2 cup)

220 g (2 cups) flour

1 teaspoon baking soda

(cinnamon or vanilla or nothing if you applesauce is already seasoned)

a big handful chopped walnuts

Preheat the oven to 180°C (350°F).

Mix the sugar with butter, add the applesauce and the remaining ingredients. Stir well.

Bake in a buttered and floured pan (or lined with baking paper because the cake is very sticky) for 40 minutes – 1 hour.

It can be served after it has cooled down, but I like to wrap it tightly in cling film and put into the fridge for several hours.

Then it becomes really moist and irresistible.

Double Damson Plum and Almond Tart

One of the magical sides of cooking is that a slight modification can unexpectedly transform an ordinary, popular dish into an unforgettable delight. I have made dozens of French-style plum tarts in my life, but always kept them simple: short crust or puff pastry, fruits, sugar and sometimes almonds. Last week, while preparing one of those, I realised I had some leftover Damson Plum Butter in the fridge and decided to spread it on the pastry before placing the plums. Very glad to find a new way of using leftovers, I haven’t suspected this thin layer would change my humble tart so much. With crunchy pastry, fruit butter, softened damsons and flaked almonds, the texture had very pleasant four different levels, while the flavours’ intensity and complexity raised my tart to a higher level of taste bud impressions. If you haven’t tested a similar tart yet, I encourage you to try it until plums are still in season. If you cannot find damsons or/and fruit butter, I am sure any other plum variety and a thick jam made from the same variety will produce a similar effect.

Before I pass to the recipe details, I would like to say I was very happy to learn that Zsuzsa (from Zsuzsa is in the Kitchen) has trusted my recipe and made my Light Unbaked Cheesecake with Vanilla. Click here to see her version.

Preparation: 1 hour

Ingredients (for 24- 28 cm diameter tart dish):

1 shortcrust or puff pastry sheet (mine weighed 230 g)

about 40 damsons or other plums

6-10 heaped tablespoons sugar (depends on the fruit’s sweetness)

10 flat tablespoons flaked almonds

about 150 g plum butter or very thick jam

Roll tout the pastry sheet and line the greased tart pan (or covered with baking paper).

Preheat the oven to 180°C.

Stone the plums and halve them.

Spread the Damson Butter on the tart bottom and cover with plum halves, skin side down, overlaying parts of the fruit. Otherwise, since the fruit will shrink, you’ll end up with big empty spaces on your tart.

Sprinkle the almonds over the plums and then the sugar.

Bake for around 45 – 60 minutes until the pastry is golden.

Vineyard Peach Jam with Crème de Cassis (Blackcurrant Liqueur)

Would you ever guess the above jam is made with peaches? Its original hue is due to the vineyard peach, the last Summer fruit in France. Its season starts in August, but stretches towards at least mid-September. I say “in France” because I have never seen vineyard peach in Switzerland and always go to buy it on French markets. I also have no idea if this variety grows in the rest of the world. I have already written about the vineyard peach here when I posted an Upside-Down Vineyard Peach Tart recipe. For those who haven’t read it, a quick summary. Vineyard peach is an old variety existing since the  XVIIth century. Since it was very sensitive to mildew, a fungus particularly dangerous to the vines, vineyard owners planted these fruit trees next to the vineyards to alert them from the future attack of the precious vines. They acted like an alarm system warning against this terrible vine disease, hence the name “pêche de vigne” (vineyard peach). No one has fiddled genetically with this fruit, so it still keeps its unattractive greyish skin and uncompromising slightly tart but definitely sweet taste. It also has a very strong wonderful aroma. Here is a vineyard peach slice:

Last year I made many vineyard peach jams, most with gin, which is also an excellent pairing for any other peach. The jams had also this beautiful deep red-pink colour. This year I wanted to experiment with crème de cassis, a French blackcurrant liqueur, traditionally made in Dijon (the same city is very famous for its mustard). I added more of this liqueur than I usually do with other alcohols and I think the resulting jam was even better than my last year’s gin version. I am planning to try other peach varieties jams also with crème de cassis, but this would have to wait for next year unfortunately…

My peaches didn’t really look organic, so I haven’t tried making Peach Peel Butter, but I can imagine its colour would be extraordinary.

Preparation: about 1 hours + processing

Ingredients:

1 kg vineyard peaches weighed without stones and peel

400g sugar (or more if the peaches are not very ripe)

juice from 1 lemon

40g pectin in powder (not necessary if you like a runny jam or if you cook it long enough to be dense)

200 – 300 ml crème de cassis

Put the peaches in boiling water for two minutes. Take them away with a slotted spoon and place immediately in cold water. After a couple of minutes the peel will come off easily with fingers. (If the peaches are organic, you can always use the peel to make Peach Peel Butter)

Remove the stones and cut the fruit into small pieces (do not throw away the juice!). Weigh it.

Put the fruit, the lemon juice and a couple of tablespoons of water into a non reactive pan and cook on a rather high heat until the peaches become soft. Stir it often and watch the pan constantly (if there is not enough liquid they will burn). Add the sugar and simmer on a low heat for ten more minutes.

Add the pectin and more sugar if the jam is not sweet enough, stir it and cook for another ten minutes. Put aside.

At the end, before filling the jars, pour the crème de cassis and stir the jam once more.

Spoon hot jam into sterilised jars, cover with lids.

Leave the jars to cool.

Place the cool jars into a big pan, cover up with hot – but not boiling- water to the level just below the lid. Bring to boil and keep on a very low heat, in simmering water, for around 20 minutes.
Stick on self-adhesive labels, write the name of the jam and don’t forget to mark the date.

NOTE: For the readers who live in the USA, the USDA-approved canning method is different. You can find it described here:
http://www.uga.edu/nchfp/publications/uga/using_bw_canners.html.

Vineyard Peach Jam with Crème de Cassis on Punk Domestics

Damson Plum Butter

Damson Plum is the queen of all the plums and Damson Butter is the king of all the fruit butters. Even though a palatable fruit butter (in other words a very thick jam) can be made practically with every fruit (or even fruit skins, as I realised only last week), damson butter is unique. Damson, Damson plum, or Damask Plum (Prunus domestica subsp. insititia) is oval with a very dark, violet skin, yellow flesh and has a very long history. Its name comes from “prunum damascenum” (plum from Damascus), since it was apparently first cultivated in antiquity in the region of Damascus. I don’t know about the rest of Europe, but it was introduced to England by Romans.

If you think you might have never spotted a damson on a tree or on a market, you must have seen its picture on a bottle of damson brandy called slivovitz, slivovitza, šljivovica, rakia… and produced in several central-European countries, such as Poland, Serbia, Hungary or Slovakia. For me the most aromatic and flavoursome comes from Serbia.

Just like damson brandy, damson butter is a part of long culinary traditions of certain countries. Even the smallest grocer or supermarket in Poland, Hungary, Slovakia or Germany carries damson butter (powidła, lekvàr, mus…), while a standard damson jam might be impossible to get there. If you want to know why, try making a “standard” jam with damsons, and then prepare the damson butter. I have made the the normal jam only once in my life and will never do this again.

Contrary to all the jams or fruit butters I know, properly made damson butter requires only plums and a bit of water. No sugar. This is not my invention of a low-sugar fruit preserve, but a genuine, traditional way of making damson butter. (By “no sugar” I mean no sweetener such as apple juice, often found in sugarless jams). The real damson butter is cooked on a very slow heat for many hours divided in two or three days. Thanks to this long and slow cooking process it keeps in a pantry for long years. I have recently opened a 5-year-old jar and it was perfectly sealed and preserved.

Damson butter has a concentrated fruit taste, with a slightly tart note. It is perfect as a filling for tarts, cookies, biscuits or as a layered cake spread. Thanks to its tanginess it’s also excellent in savoury dishes: with roast pork, chicken, turkey, smoked bacon, in sandwiches, on pancakes, crêpes, with terrines, pâtés, foie gras… In short, this is the only fruit jam I cannot imagine my life without.

Damson butter making process is not difficult. No peeling is involved and stones go out quite easily. It requires however a certain patience and a big batch of fruit; don’t bother if you have less than 3 kg, since the yield is quite low.  Thus, if you have 5 kg plums, you will obtain only 1,5 – 2 l fruit butter. Everything depends of course on the damsons’ quality, skin thickness and cultivation methods. On the other hand, when buying a big box of fruit, you often obtain a substantially reduced price.

I have been making damson butter for many years and can assure you all the effort, time and money spent are definitely worth it.

NOTE: even if you have very ripe plums, the final butter might prove very acid. You can add some sugar, but only at the end, when the thick consistency is obtained and usually it is no more than 10% of the initial fruit weight. Do not add the sugar earlier, since it might make the butter burn easier.

Preparation: about 10 hours (divided into 2-3 days)

Ingredients (yield: about 1,5 l):

4 kg damsons

water

(sugar)

Wash the plums, stone them and put in a big pan.

Add some water (about 10% of the fruits’ initial weight), so that they don’t stick to the bottom until they start releasing their juice.

Put the pan on a low heat and let it simmer, stirring occasionally. First you can stir every 30 minutes, but when the mixture thickens, you should lower the heat to the absolute minimum and stir it every ten minutes. The thicker the mixture,  the more often you should stir it.

If the pan burns, quickly transfer the unfinished butter to another pan (otherwise it will “take” the burnt flavour).

The butter is ready when you put a wooden spoon in the middle and it doesn’t move.

When you obtain this final consistency, taste the butter. If you think it’s too acid, add sugar, let it simmer, constantly stirring and continue adding sugar and stirring until the required sweetness is obtained and the sugar is dissolved.

Some damsons might seem very sweet at the beginning, but at the end the butter might come out too acid.

If you had ripe plums normally you shouldn’t add more than 10% of sugar compared to the initial fruit weight. (I have never added more than 10% of the final butter weight).

Don’t add sugar before the final, very thick consistency is obtained.

/At this point you can either freeze it (after the butter has cooled down) or keep it in the fridge for a couple of weeks, or process it in the jars, as described below, and store it in your pantry for several years!/

Pour the butter, still hot, into sterilised jars. Cover with lids. Leave the jars to cool.

Place the cool jars in a big pan, bottom lined with an old kitchen towel folded in two (this will prevent the jars from breaking), cover up with hot – but not boiling – water to the level just below the lid. Bring to boil and keep on a very low heat, in simmering water, for around 20 minutes.
Stick on self-adhesive labels, write the name of the butter and don’t forget to mark the date.

NOTE: For the readers who live in the USA, the USDA-approved canning method is different. You can find it described here:
http://www.uga.edu/nchfp/publications/uga/using_bw_canners.html.

Damson Plum Butter on Punk Domestics

Peach Peel Butter

What you see above is a complete outsider in the world of jams and other fruit preserves. At least in my pantry. I had this crazy idea last weekend while getting ready for my umpteenth Peach Jam with Gin batch. I suddenly remembered reading, in an old cookery book,  something about using fruit skins, leftover from jams or other preserves. I didn’t remember which book it was in, nor the exact recipe, but when I found myself with skins from 2 kg organic peaches, I decided to give them a chance for a second life.

In order to obtain this butter I had to simmer skins with sugar until they disintegrate. It took me many hours (two days to be frank), but the result was definitely worth the efforts, even though I obtained only one jar. The peach skin butter is slightly tart, reminds me of a bit of plum jams and certainly doesn’t look or taste like a leftover preserve. The obtained colour depends on the skins’ hue (mine were rather reddish). It will be perfect as a pie or biscuit filling or on bread, instead of jam. Needless to say, I am already planning to save other skins and peels from the bin.

Preparation: 2 days (about 6 hours of simmering)

Ingredients (yield: 1 x  250 ml jar):

peels from 2 kg peaches

sugar (starting with the amount equal to the peels’ weight; I finally added 2 x the peels’ weight)

juice from 1 lemon

lots of water

Weigh the peels. Put them in a pan, cover with the equal amount of sugar, add the lemon juice and 1/2 litre water.

Let it simmer, giving a stir from time to time, adding water as soon as it evaporates and checking if the peels don’t stick to the bottom of the pan.

You can also add more sugar during the cooking process if you see the mixture is not sweet enough.

If you prepare it in two days, simply cover the pan with a lid and start once more the following day, adding water.

When skins have disintegrated, taste if the skins are not too acid/too sweet (add more sugar or lemon juice) and constantly stirring let the mixture thicken to a fruit butter consistency.

/At this point you can either freeze it (after the butter has cooled down) or keep it in the fridge for a couple of weeks, or process it in the jars, as described below, and store it in your pantry for at least a year!/

Pour the butter, still hot, into sterilised jars. Cover with lids. Leave the jars to cool.

Place the cool jars in a big pan lined with an old kitchen towel folded in two (this will prevent the jars from breaking), cover up with hot – but not boiling – water to the level just below the lid. Bring to boil and keep on a very low heat, in simmering water, for around 20 minutes.
Stick on self-adhesive labels, write the name of the butter and don’t forget to mark the date.

NOTE: For the readers who live in the USA, the USDA-approved canning method is different. You can find it described here:
http://www.uga.edu/nchfp/publications/uga/using_bw_canners.html.

Peach Peel Butter on Punk Domestics

Mirlitons de Rouen, or Almond Tartlets Filled with Jam

“Elle à table” is the only food magazine I regularly buy. It is modern, creative, interesting, doesn’t feature only recipes, but also food-related articles and, most of all, is not aimed only at housewives, but at foodies in general, regardless their profession, time spent in the kitchen or cooking skills. The other day, leafing through the Summer edition, I saw very tempting mini-tarts called “mirlitons”, checked if I had all the necessary ingredients and made them on the spot.

Mirlitons originate from Rouen, in the North of France and there are slim chances to find them in a “standard” pastry shop in a different region of France. The basic recipe calls for an almond and eggs filling with vanilla and orange flower water. The “Elle” recipe included some jam filling and it was the main reason why I have decided to try it. As a notorious food preserver I am in a constant search of other jam use ideas than a simple buttered toast, so they instantly caught my eye.

Mirlitons are quick, easy, have a very pleasant mixture of flavours and textures and are luscious even without vanilla or orange flower water. Thumbprint Hazelnut Cookies and Thumbrint Almond Cookies are other options to use leftover or surplus jam.

Note: These mirlitons shouldn’ t be mixed up with Mirlitons de Pont-Audemer. Shaped like cigars, they are another regional sweet specialty, but completely different and much more complicated to prepare. I hope I will manage to make these one day too…

Special equipment:

pastry cutter (mine had a 11 cm diameter)

tartlet moulds

Preparation: 1 hour

Ingredients (makes 12-14 mirlitons):

1 puff pastry sheet (230 g – 240 g)

100 g ground almonds

100 g caster sugar

2 eggs

(vanilla, orange flower water)

about 200 g thick jam or fruit butter

5 tablespoons thick cream

flaked almonds

Preheat the oven to 180°C.

With a pastry cutter cut out circles and place in the tartlet moulds.

Put a heaped teaspoon of jam in the centre of each tartlet case.

In a bowl combine the eggs, the sugar and the ground almonds. Add the cream and stir well.

Cover the tartlet cases with the almond mixture up to 3/4 of the height.

Sprinkle with flaked almonds and bake for about 20 minutes until golden.

Serve warm or cold.

Thumbprint Hazelnut Cookies with Jam

Every year, when jam making season arrives I realise once more I have made too many jars which would better be finished to make space for the new generation. Rather than forcing ourselves to have toast with jam for breakfast, lunch and dinner, I prefer making sweet treats calling for jams or fruit sauces, such as Thumbprint Almond Cookies. A couple of days ago I wanted to prepare them once more, realised I was short of almonds and substituted them with ground hazelnuts. The hazelnut version was so good, I am now wondering which one is my favourite… They may look clumsy (the jam is always oozing out of the thumbprint hole during the baking process), but the taste is heavenly.

Before the recipe details I would like to thank Mr. Three-Cookies (from Three Cookies) and Raymund (from Ang Sarap), who invited me to take part in Seven Link Challenge. The challenge consists of presenting 7 links from one’ own blog, each in a different category and then inviting other bloggers to participate in it. The aim is to present some older posts from ones’ blog and to share with the readers our opinions and facts about it.

Choosing the links for the 7 categories was not an easy task. It was however a great occasion to look back on my texts, photos and to have a critical view of my blog. Thank you, once more, Raymund and Mr. Three-Cookies, for tagging me! I will do the best I can. Here are the promised 7 links:

1. The most beautiful post.

I don’t know if I’m influenced by the way it looked in reality, but Asparagus Tempura is my favourite. It’s one of the most beautiful dishes I have ever had on my table.

2. The most popular post.

If I am to believe the number of visit Google has registered, the most popular was Chicken Karaage. I must say it was a very big surprise since I didn’t know there were so many people interested in this Japanese recipe!

3. The most controversial post.

I wouldn’t call it controversial, but since Marmite (the British savoury bread spread) is maybe the most love-or-hate product I have ever used, I might classify the Marmite Muffins as controversial. Believe me, even if you are not a Marmite fan, these muffins are irresistible!

4. The most helpful post.

I have no idea what might seem helpful to my readers. For me the thing that was really helpful was discovering how to make Dashi, or the Japanese stock. Since I started preparing it on my own, I realised how important it was in lots of dishes, not only in soups.

5. The post that was surprisingly successful.

The post which earned me most compliments and interest was Hot Strawberry Sauce. It is my all-time favourite hot sauce and I was positively surprised it appealed to so many readers.

6. The post that didn’t get the attention it deserved.

Actually I will bend here the rules and talk about two posts, both featuring Gochujang, sweet and hot chili paste, the only Korean ingredient I cannot live without.

Black Pudding and Gochujang Toast is the French (or rather European) and Korean fusion snack I would love everyone to try one day. Every time I make it I think how simple it is and how perfect for someone who is fond of gochujang and who adores good black pudding (aka blood sausage).

Scallops with Gochujang are one of the simplest and quickest meals or snacks I can imagine and I would love everyone to taste this combination one day. They go surprisingly well with… sour cream and when scallops are in season I prepare this dish quite often.

7. The post I am most proud of.

I wouldn’t really say here “the post” since the photo isn’t great. Fat Liver Terrine with Port (Foie gras au porto) is rather the culinary accomplishment I still am very proud of.

Duck Fat Liver Terrine is one of my top 5 dishes and usually the most expensive item on the restaurants’ menu. Even though raw fat liver does not cost a fortune and is easy to order from every butcher in France, very few – even French – house cooks ever try preparing it. There is a kind of mystery surrounding its long and a bit complicated preparation. Since there is someone in my family who does it divinely well, I decided to experiment one day on my own and was surprised how fabulous even a less-than-perfect looking home-made terrine is. Since I started making it on my own I have also become very critical to what is served in restaurants and often is simply awful.

It wasn’t easy at all! Now the invitation part! The rule is to choose 5 blogs to continue this game. I bent the rules once more and have chosen three “group” websites created and written by friends, couples or families. I wonder if they easily agree on the seven links’ choice… Hereby, I would like to invite the following bloggers to participate in this challenge:

-Shilpa and Jenny from Baking Devils

-Katherine and Greg from Rufus’ Food and Spirits Guide

-Sara and her sisters, hiding under the pseudos kclever and mclevering, from Three Clever Sisters.

If you want to take part in this links challenge, you are more than welcome!

(I would also have tagged of course Nami and Shen from Just One Cookbook, but Nami already took part in this challenge.)

Now back to the Hazelnut Cookies recipe! These cookies can be baked in any moulds (or even without moulds). This time I used mini-muffin ones to make them really tiny. The recipe calls for matzo bread, but leftover biscuits (even slightly savoury crackers) can be used here too.

Preparation: 1 hour+ 1 h 30 min in the fridge

Ingredients (about 40 mini cookies):

100 g butter, melted

90 g ground hazelnuts

45 g matzo bread or biscuits (sweet or slightly salty)

1/4 teaspoon salt

130 g confectioners’ sugar (or less if using very sweet biscuits instead of matzo bread)

1 egg

half a 300 ml jar of thick jam

Mix everything in a food processor (apart from jam). Put into the fridge for at least 1 hour to become firm.

Preheat the oven to 180°C.

Fill in the greased mini-muffin – or other –  forms with a 2 cm thick layer of the dough. (You can also form circles and put them simply on a baking sheet, but in my case the cookies spread around them and became flat).

With your thumb (or another similarly shaped tool) make a small indentation in the middle of each cookie. Put once more into the fridge for 30 minutes.

Take the cookies out from the fridge and fill the indentations with jam.

Bake around 10-20 minutes till they become slightly golden (check if the bottoms are well cooked).

Take them out of the oven and take out of the forms when they are cold.

They keep for several days covered with a plastic film.

Jam Cake with Okara

In my previous post I explained how I made (quickly and easily) okara (おから) at home. (As a reminder, okara is a very healthy by-product of the soy milk or tofu production.) This cake recipe is my first experience with okara use, but certainly not the last. The addition of okara made is taste lighter and softer, not to mention all the nutritious and healthy elements brought by okara. Last, but not least, a very important information: even those who hate soy milk, tofu etc. appreciate this cake and do not notice anything unusual.

Since the Spring is my “emptying last year’s jars” season, I made this cake with King of the Pippins sauce I had put into jars last year (King of the Pippins is an exceptional apple variety, read more about it + the sauce recipe here). However, this cake can be made with any fruit sauce, jam, marmalade or freshly made fruit purée. Excellent way to use up the leftover fruit (puréed and then sweetened) or the remains of a big jam jar. This cake was prepared with half of the okara I have recently made.

Preparation: 2 hours – 2 h 1/2

Ingredients (one small cake, serves 4):

125 g slightly moist okara

10 heaped tablesoons flour

pinch of salt

7 tablespoons sugar

50 g softened butter

(cinnamon)

a 200 ml jar of fruit jam, sauce of purée

Combine all the ingredients (except for the jam) mixing with your hands in a bowl or in a food processor.

You may add some cinnamon, but it’s not obligatory.

Divide the mixture in three parts and put one of those in a plastic bag in the freezer.

Leave it there to chill for one hour.

Preheat the oven to 180°C.

Line up a greased dish (mine was 10x20cm big) with the remaining 2/3 of the dough.

Spread the sauce or the jam over the top.

Take out the chilled 1/3 of the dough and grate it over the jam (on a grater with big holes).

Bake until slightly golden (about 1hour – 1h15min).

Quince Sauce

Saying the quince sauce is made of the leftovers is not a very good advertisement for this delicious preparation. It doesn’t change the fact that this is what I did this weekend with the cooked quince, after the juice has been strained to make the quince jelly (click here to see the details). Since there is hardly any juice left, this sauce is very thick. It can also be prepared of course from the scratch, starting with the raw quince, and skipping the jelly stage. Then it will take a bit more time.

The sauce has a beautiful pale orange hue, a fabulous smell, recalling a very delicate honey, and a slightly tangy taste. It is perfect on toast, as a pie or another pastry filling. Personally I am more impatient to taste this “by-product” than the main, more difficult, famous quince jelly.

If, like me, you have made quince jelly, the sauce preparation will hardly take half an hour (counting from the moment the juice is strained) and, like every fruit sauce, this one requires a food mill.

Special equipment: a food mill

Preparation: 30 minutes (or 1h30 if using raw quince)

Ingredients:

2 kg cooked quince, left after the jelly preparation (but weighed before cooking) or 2 kg raw quince

at least 1 kg caster sugar

juice from one lemon

(If using raw quince wash the fruit, scraping the soft hair and cutting off the stems. Cut it rougly in four or more pieces and put them in a big shallow pan. Pour a litre of water, cover the pan and cook it at medium heat until the fruit is well cooked and almost falls into pieces.)

Pass the cooked quince through a food mill, put (with the juice, if you weren’t making the jelly) into a big pan.

Add the lemon juice, the sugar and cook, stirring around 15 minutes or until the sugar is dissolved and the sauce starts boiling. Taste if the sauce is sweet enough, add more sugar if needed, cook a bit to dissolve it.

(If you weren’t making the quince jelly, pour the lemon juice and cook until the sauce has the required consistency, add the sugar and cook 15 more minutes, then taste and add more sugar if needed, cook a couple of minutes stirring).

/At this point you can either freeze it (after the sauce has cooled down) or keep it in the fridge for a couple of weeks, or process it in the jars, as described below, and store it in your pantry for at least a year!/

Pour the sauce, still hot, into sterilised jars. Cover with lids. Leave the jars to cool.

Place the cool jars in a big pan, bottom lined with an old kitchen towel folded in two (this will prevent the jars from breaking), cover up with hot – but not boiling – water to the level just below the lid. Bring to boil and keep on a very low heat, in simmering water, for around 20 minutes.
Stick on self-adhesive labels, write the name of the sauce and don’t forget to mark the date.

Quince Jelly

For those who don’t know the quince, it’s a beautiful plump yellow fruit which shape might be described as something between a pear and an apple. The taste however has got nothing in common. The quince has a wonderful honey-like aroma and contains a lot of pectin, hence it’s perfect transformed into jelly. When unripe, the quince has greyish soft hair covering the skin. Raw quince has a very tart unpleasant taste and shows its gustative qualities only when cooked or preserved.

I made my first quince jelly last year, when I was offered tons of fruit from my family. This year, however, I was sure I had missed the quince season…  Then, last Saturday, I finally managed a trip to my market and was simply euphoric at the sight of what was probably my last chance of the year. Since the fruits were particularly big, ripe and beautiful, I have taken practically all those which weren’t too much bruised or rotten.

Even though all you need is quince and caster sugar, the jelly is not easy to make. The whole process seems simple, but getting the right consistency is difficult and irritating. Mine were very ripe, so they had less pectin and reaching the right jelly consistency was longer. On the other hand, since these were the ripest quinces I have ever had, the smell and the red brick colour were pure magic…

The yield is very low, but the good news is the fruit used in making the jelly can be transformed too! More news tomorrow!

Preparation: 2 hours

Ingredients:

at least 2 kg quince (the yield is very low, I obtained two small jars out of two kg quince)

white sugar

Wash the quince, scraping the soft hair and cutting off the stems. Cut them rougly in four or more pieces and put them in a big shallow pan (together with the pits, since they contain lots of pectin).

Pour a litre of water, cover the pan and cook it at medium heat until the fruit is well cooked and almost falls into pieces.

Strain the juice. Weigh it and add to it the same weight of sugar (it is also possible, if the quince is very ripe, to put half of the sugar, thus obtaining a slightly tangy jelly).

(Don’t throw away the cooked fruit! Store it in a cool place until the following day. More advice tomorrow!)

Put a small plate in the the coldest part of the fridge.

Start cooking on a medium heat, stirring from time to time.

After 30 minutes make a first test of the jelly consistency.  Take the small plate out of the fridge, pour a small drop of the jelly and move the plate.

If the drop stays in place and doesn’t flow, the consistency is right.

Test the consistency every ten minutes and don’t overcook the jelly. Overcooked it takes a burnt caramel taste.

/At this point you can either freeze it (after the jelly has cooled down) or keep it in the fridge for a couple of weeks, or process it in the jars, as described below, and store it in your pantry for at least a year!/

Pour the jelly, still hot, into sterilised jars. Cover with lids. Leave the jars to cool.

Place the cool jars in a big pan, bottom lined with an old kitchen towel folded in two (this will prevent the jars from breaking), cover up with hot – but not boiling – water to the level just below the lid. Bring to boil and keep on a very low heat, in simmering water, for around 20 minutes.
Stick on self-adhesive labels, write the name of the jelly and don’t forget to mark the date.

Tomorrow I’ll explain what to do with the leftover cooked fruit…

Nectavigne Jam

Remember the vineyard peach? Nectavigne is its young and beautiful cousin. This French cross between the vineyard peach and the nectarine exists on the market only since 2004 and I hope it will stay for good! I usually am not fond of the newly developed fruit or vegetable varieties, as they tend to be rather good looking than good tasting, the main interest being easy, fast and cheap  growing process. I find however the nectavigne simply enchanting! Maybe it is an easily grown fruit, but it certainly is also delicious and very aromatic. I am only worried it’s so rarely seen on the markets…

Like the vineyard peach, nectavigne takes on a darker, beetrooty colour during the cooking process and it looks very originally among other jars. The jam is made more or less in the same way as the peach jam I posted a while ago, but the peeling stage is omitted and since the nectavignes are harder than the peaches, I prefer dividing the cooking time in two days.

Special equipment: wear rubber gloves while manipulating the fruit (it stains the nails for a couple of days)

Preparation: around 1 hour +jars processing

Ingredients:

1 kg stoned nectavignes

300g sugar (or more if the fruit is not very ripe)

juice from 1 lemon

40g pectin in powder (or less if you prefer a runny jam)

Cut the fruit into small pieces (do not throw away the juice!).

Put the fruit, the lemon juice and a couple of tablespoons of water into a non reactive pan and cook 20 minutes on a rather high heat until the nectavignes become soft. Stir it often and watch the pan constantly (if there is not enough liquid they will burn). Add the lemon juice, the sugar, let it dissolve, cover and put away for the night.

The following day cook the nectavignes for 20 more minutes.

Add the pectin and more sugar if the jam is not sweet enough, stir it and cook for another ten minutes. Put aside.

Spoon hot jam into sterilised jars, cover with lids.

Leave the jars to cool.

Place the cool jars into a big pan, bottom lined with an old kitchen towel folded in two (this will prevent the jars from breaking),  cover up with hot – but not boiling- water to the level just below the lid. Bring to boil and keep on a very low heat, in simmering water, for around 20 minutes.
Stick on self-adhesive labels, write the name of the jam and don’t forget to mark the date.


King of the Pippins Sauce

I would like to introduce you to the King of the Pippins, the most beautiful and aromatic apple in the world. If you have ever found such apples on the market and were put off by their greyish spots or uneven colour, wait to cook, bake them or simply leave them for several days and feel the wonderful smell they leave in your kitchen. Then you’ll understand why in the olden days apples were used as interior perfume.

Developed by the French in the 18th century, King of the Pippins (or “reine de reinettes” in French) is one of the oldest apple varieties. Due to its strong aroma, its sharp, but not acid taste, it is considered perfect for cooking, baking and preserving. Personally, I don’t undertstand why it is not considered also as one of the best apples even eaten raw. But then, I do not belong to the majority of consumers who love overly sweet, bland (read: tasteless) apples…. provided they are red and shiny. Luckily King of the Pippins is not forgotten by my farmers’ market and I can buy it every year!

As you may have already guessed King of the Pippins is not the kind of apple found all year long in supermarkets nor industrially farmed, so if you want to keep a bit of its exceptional taste, make some jars of apple sauce and use it later in cakes or pies. When making apple sauce I usually add either vanilla or cinnamon, but King of the Pippins is an exception. It is simply too good to be mixed with any spice, and the sauce has such a beautiful golden colour it would be pity to spoil it with anything.

As in the case of Pear and Prune Sauce, this one can be made in two times, for example the apples’ softening stage one day and the rest the following day.

Preparation: 2 hours (+ hot water  bath processing)

Special equipment: a food mill (a sieve and a spoon my be used instead, but it takes much longer)

Ingredients (yield: 4 – 5 x 300ml jars):

2 kg apples

1 kg or more caster sugar (the amount depends on the apples’ degree of maturity)

500ml water

juice from one big lemon

Cut up the pears roughly in 4 pieces each, discarding only the stems. Put them into a big pan (there should be some free space at the top), add the water, cover and cook on medium heat until they are completely soft and fall into pieces.

Pass them through a food mill (the skins and pips should be left in the fruit mill).

Put back into the pan, add the lemon juice and the sugar. Cook uncovered on a medium heat.

After 30 minutes check the consistency. When it has reached the thickness of a sauce, taste it and add more sugar if required. Cook 10 more minutes.

/At this point you can either freeze it (after the sauce has cooled down) or keep it in the fridge for a couple of weeks, or process it in the jars, as described below, and store it in your pantry for at least a year!/

Pour the sauce, still hot, into sterilised jars. Cover with lids. Leave the jars to cool.

Place the cool jars in a big pan, bottom lined with an old kitchen towel folded in two (this will prevent the jars from breaking), cover up with hot – but not boiling – water to the level just below the lid. Bring to boil and keep on a very low heat, in simmering water, for around 20 minutes.
Stick on self-adhesive labels, write the name of the sauce and don’t forget to mark the date.

Pear and Prune Sauce

If you have two spare hours this weekend and love pears, make some pear sauce! Observing my farmers’ market I presume now is the best moment to make one: the prices are low and the pears are plentiful. Usually the cheapest pears are slightly under-ripe, ugly (but not bruised!), small ones, and these are perfect for a combination with prunes or spices. Whatever variety you use, the pears shouldn’t be too ripe or too floury in texture. If they are completely unripe, you only need to wait a couple of days and they’ll ripen a bit.

Once preserved, fruit sauce is very versatile. It can be eaten as a dessert, a tea time snack (the best one is cold, kept several hours in the fridge) or used as a pie, tart or another cake filling. The sauce can be done solely with pears, but when you get bored doing the same thing, cinnamon, vanilla or cloves are a nice change. My personal favourite is pears-prunes version, the prunes adding a bit of tartness and character.

Fruit sauce is ridiculously easy to prepare. No need to peel, to cut up finely or to stir continuously and the process can be divided in two parts, which means the first stage can be done one day and the second the following day.

If you don’t have a food mill yet, this is the moment to buy one. It’s usually very cheap (at least in Switzerland and France) and is sold in most kitchenware shops or even supermarkets. Several years ago I bought the cheapest I could find and it’s perfect! When using prunes, a food processor might be handy too, but you can chop the prunes instead.

Preparation: 2 hours (+hot water  bath processing)

Special equipment: a food mill (a sieve and a spoon may be used instead, but it takes much longer)

Ingredients (yield: 4 – 5 300ml jars):

2 kg pears

1 kg or more caster sugar (the amount depends on the pears’ sweetness)

500ml water

20 prunes (stoned)

juice from one big lemon

Cut up the pears roughly in 4 pieces each, discarding only the stems. Put them into a big pan (there should be some free space at the top), add the water, cover and cook on medium heat until they are completely soft and fall into pieces.

Pass them through a food mill (the skins and pips should be left in the fruit mill).

Put back into the pan, add the lemon juice, the sugar and the prunes (chopped if you don’t have a food processor; whole if you have one). Cook uncovered on a medium heat.

After 30 minutes check the consistency. When it has the thickness of a sauce, take off the heat.

Mix in a food processor, put back to cook (omit this step if you’ve chopped the prunes beforehand). Check the sweetness, add more sugar if required and cook 10 more minutes.

/At this point you can either freeze it (after the sauce has cooled down), or keep it in the fridge for a couple of weeks, or process it in the jars, as described below, and store it in your pantry for at least a year!/

Pour the sauce, still hot, into sterilised jars. Cover with lids. Leave the jars to cool.

Place the cool jars into a big pan, bottom lined with an old kitchen towel folded in two (this will prevent the jars from breaking),, cover up with hot – but not boiling- water to the level just below the lid. Bring to boil and keep on a very low heat, in simmering water, for around 20 minutes.
Stick on self-adhesive labels, write the name of the sauce and don’t forget to mark the date.

Peach Jam with Gin


I never liked jam or anything sweet for breakfast. Therefore, when it comes to preserving, I prefer fruits in their savoury and/or spicy forms (see the previous posts on mango and plum sauces). I prepare jams, marmelades and other sweet jars for the jam-loving part of my family and friends, but I also use them to glaze roast or grilled meat, put in cakes or pies, mix into drinks… This summer’s first jams are made with peaches.

Peach is I think my favourite fruit. Since I was a child I have only hated its hairy, felt-like peel. Even now, when eating a whole raw peach, I always put it under water so that the peel becomes smooth. My favourite is the yellow flesh variety, but I am not sure if it’s because of the actual taste or simply the colour.

Just like tomatoes, peaches are very easy to peel when put for a minute or two in boiling water. It takes only around 15 minutes to peel a kilo of fruit, so easier than one might suspect. Even though my jam became orange and lost the beautiful yellow peach colour (cooked for too long probably), it has a perfect “peachy” taste and smell. Gin enhances the peach taste, gives the jam a certain je ne sais quoi and makes it more… sophisticated.


Preparation: around 1 hour+jars processing

Ingredients:

1 kg very ripe peaches weighed without stones and peel

300g sugar (or more if peaches are not very ripe)

juice from 1 lemon

40g pectin in powder (not necessary if you like a runny jam or if you cook it long enough to be dense)

100ml gin

Put the peaches in boiling water for two minutes. Take them away with a slotted spoon and place immediately in cold water. After a couple of minutes the peel will come off easily with fingers.

Remove the stones and cut the fruit into small pieces (do not throw away the juice!). Weigh it.

Put the fruit, the lemon juice and a couple of tablespoons of water into a non reactive pan and cook on a rather high heat until the peaches become soft. Stir it often and watch the pan constantly (if there is not enough liquid they will burn). Add the sugar and simmer on a low heat for ten more minutes.

Add the pectin and more sugar if the jam is not sweet enough, stir it and cook for another ten minutes. Put aside.

(Here you can pour the gin and stir the jam once more before filling the jars).

Spoon hot jam into sterilised jars, cover with lids.

Leave the jars to cool.

Place the cool jars into a big pan, bottom lined with an old kitchen towel folded in two (this will prevent the jars from breaking), cover up with hot – but not boiling- water to the level just below the lid. Bring to boil and keep on a very low heat, in simmering water, for around 20 minutes.
Stick on self-adhesive labels, write the name of the jam and don’t forget to mark the date.

Peach Jam with Gin on Punk Domestics