Category Archives: Hungarian

Székely Gulyàs with Gochujang, or Koreanised Hungarian Pork and Sauerkraut Stew

gulyasgochujangpj

Hungarians and Koreans have at least one thing in common: a huge passion for chili pepper. In spite of such an important link I don’t think I have ever heard of Hungarian-Korean fusions dishes. I don’t know how and why I had a crazy idea to incorporate gochujang (Korean chili paste) into the Hungarian Székely Gulyàs, but I have greatly enjoyed this amusing experiment and thought I would share my impressions with you.

Most of you have probably heard about the famous Hungarian Gulyàs. Székely Gulyàs (pronounced “see-cay goo-yash”) looks and tastes different, mainly because it includes sauerkraut (fermented cabbage). I discovered it last year thanks to Zsuzsa ( from Zsuzsa is in the kitchen). I wrote about it last year (here) and have prepared it many times without feeling any need of alterations. The origins of the name are not clear. Some people say it comes from an ethnic group called “Székely”, who still lives in the present Romania, others – like Kàroly Gundel, a famous Hungarian cook – say it was named after a writer Jozsef Székely, whom Gundel calls the “godfather” of this stew. Whatever the origins, Székely Gulyàs is worth discovering. It is quick, easy, can be made in advance and even though it’s hearty, it has few calories and almost no fat (if you use lean meat). In short, it’s a perfect one-pot meal for cold winter days and the same could be said about its Koreanised version.

Gochujang, one of the staples of the Korean cuisine, is a sticky hot paste based on chili and soy beans. It has different levels of hotness, but gets never as strong as, say Thai curry paste. Here gochujang, used instead of dried Hungarian paprika, mellowed the flavours and brought a different complexity to the final result. Combining gochujang with European saurekraut seemed weird at first, but on the other hand, gochujang is often added to warm dishes containing kimchi (Korean fermented cabbage), so finally the satisfying result of my experiment shouldn’t come as such a big surprise. As a final Korean touch,  I have added some toasted sesame seeds and sprinkled the dish with Korean chili pepper. I hope that my Hungarian friends will not be shocked by these bold alterations.

If you don’t feel like “Koreanising” this Hungarian dish, you might want to try the “basic” Székely Gulyàs:

szekely4p

TIPS:

Székely Gulyàs is traditionally served with sour cream, but I find it equally delicious with thick sour milk or Greek yogurt. It was surprisingly good with this Koreanised version.

Like many stews, this one gets at least twice as good when reheated the following day. Actually it improves every time it’s reheated.

Do not throw away the liquid drained from the sauerkraut. You can add it during the cooking process if you feel your dish is not tangy enough. Personally I love my sauerkraut dishes very tangy, so I don’t even drain the liquid most of the time.

Preparation: about 2 hours (but it’s definitely best reheated the following day)

Ingredients (serves 2):

300 g lean pork

1 small onion

1 big garlic clove

300-350 ml sauerkraut (raw, not cooked)

3 tablespoons gochujang (medium hot) or more, depending on your preferences

1-2 tablespoons oil

sour cream or milk

salt, pepper

2 teaspoons toasted white sesame seeds

Korean dried chili pepper (to sprinkle on top)

Drain the sauerkraut, but don’t throw away the liquid (see the TIP above).

Cut the meat into bite-sized pieces.

Chop the onion and the garlic.

Fry the onion until soft.

Add the meat and fry it until golden brown.

Take the pan from the heat, add the spices and the garlic, 125 ml (1/2 cup) water.

Lower the heat and simmer the meat covered for one hour.

Take off the lid, add the sauerkraut and some more hot water to cover the whole dish.

Add the gochujang.

Continue to simmer first uncovered, then, after 30 minutes, covered for about 1 hour in total.

Add sesame seeds about 10 minutes before serving.

Serve with a splash with sour cream and/or sprinkled with Korean chili pepper. You can let it cool down, refrigerate overnight and serve it reheated the following day. (You can also freeze it).

Hungarian Chicken with Paprika (Paprikás csirke)

paprikascsirkepj

Sweet peppers are still on the market, it’s getting cold, we crave warming, hearty dishes… It seems the best moment to enjoy paprikás csirke. The first time I tasted paprikás csirke (pronounced paprikash cheer-ke) was at my friend A.’s parents’ house in Hungary. It smelt deliciously, its deep beautiful red colour made it look like a Hungarian cookery magazine photo, and the taste was heavenly. It was served with small home-made dumplings called “galuska” (see the TIPS) and cream. Ever since then I have been repeating myself I had to try preparing it one day. I suspected Chicken with Paprika to be much more difficult and time-consuming. In reality it is ridiculously easy, requires few ingredients (I could practically make it every day given my fridge and cupboards’ content) and, last but not least, if you don’t put too much fat at the onion frying stage and if you remove the skin, the whole dish is not heavy neither greasy. In short, one more dish confirming that Hungarian cuisine is simple, delicious and not necessarily heavy or greasy.

Once more during my exploration of the Hungarian cuisine, I decided to try the recipe from Zsuzsa is in the kitchen blog. And once more I wasn’t disappointed. I have simplified the cooking process (my free-range chicken didn’t need any “improving” tricks), modified the quantities a bit and added 1 tablespoon hot paprika, since I wanted the dish to be a bit hot. Oh, and I would have forgotten – this dish is at least twice as good when warmed up the following day! Thank you so much, Zsuzsa, for teaching me one more excellent Hungarian dish that has become a regular – and very welcome – guest on our table.

TIPS: If like me this time you don’t have fresh tomatoes, you can use canned tomatoes or tomato purée (unseasoned).

The perfect sweet peppers to use here are long green or yellow sweet peppers.

The taste of caraway seeds is hardly perceptible, but it adds a certain je ne sais quoi to the dish. Do no skip it if you have it (if not, buy caraway seeds).

Galuska (or nokedli) are small, irregularly shaped dumplings grated through a special grater  and served often with this chicken dish. Luckily, small Swiss dumplings called spätzli are made in the same way, so finding here the right utensil for next time shouldn’t be complicated. In the meantime I served the chicken with good white bread. Visit Zsuzsa’s blog to see her nökedli/galuska recipe.

Last but not least, try the first, onion frying stage, with lard or (like I did) with duck fat. The taste will really be much better.

Preparation: 1 hour 30 min

Ingredients (serves 4):

2 skinned chicken legs and 2 breasts cut in two parts each or 4 breasts / 4 legs but the best results are obtained if you keep some chicken bones

6 medium tomatoes + 200 ml water (about 4/5 cup) or the same volume of natural tomato purée (passata)

5 – 6 green or yellow or any variety of sweet long peppers

2 tablespoons lard/duck fat or oil

3 tablespoons sweet Hungarian paprika

1 tablespoon hot Hungarian paprika

1 big onion

1/4 teaspoon caraway seeds

2 garlic cloves

water

sour cream or Greek yogurt (I use “sour milk”, which is roughly skimmed sour cream)

(parsley)

Put the tomatoes for a minute in boiling water and transfer them afterwards to a cold water bowl. Peel them and chop them.

Remove the peppers’ seeds and stalks. Cut them into bite sized pieces.

Chop the onion. Sauté it on a low heat until transparent.

Add the chicken and fry it, stirring, for a couple of minutes.

Remove from the heat. Add the paprika, the salt, the pepper, the caraway, the tomatoes, the peppers and 200 ml water (or 200 ml tomato purée and no water).

Cook it covered over low heat until the chicken is soft inside (it’ll take around one hour to make the chicken very soft, as I prefer it, the flesh falling from the bones).

Check in the meantime if some more water should be added.

Serve with sour cream and galuska (nokedli, see above).

My chicken was still excellent served only with good white bread.

Lecsó (Hungarian Pepper Stew)

lecsop

This week something unusual has happened. I prepared a dish posted by a blogger a long time ago only to see the same person post one of my recipes two days afterwards. I talk of course about Zsuzsa (Zsuzsa is in the kitchen) who has made a real piece of art (see it here) out of my Poppy Seed and Chocolate Cake recipe and moreover called her post “Birthday Cake for Sissi”. (I felt as if it was my second birthday this year…). Zsuzsa had no idea that two days before I had prepared the famous Hungarian pepper stew (lecsó), following her recipe. I haven’t told her of course because I wanted to make a small surprise, so here it is: Zsuzsa’s extraordinary, genuine Hungarian lecsó.

Of course this is another dish I prepared  using the peppers brought by my friend from Hungary (I have used some of them in Hungarian Stuffed Peppers) and I hope this “detail” made my lecsó even more Hungarian. In case you have never heard about it, lecsó (pronounced letcho) is a big Hungarian  classic. Just like stuffed pepper it calls for long light yellow sweet peppers with thin skin. Lecsó is usually served either with sausage (according to my Hungarian friend the best ones are the smoked, but not dried sausages, such as Hungarian, Polish or German) or with beaten eggs which are incorporated into the lecsó at the end. It is also often cooked together with rice, but I wanted to have it with some crunchy baguette and fried sausage, so I have skipped the rice. Lecsó can also be an excellent side dish served with meat or fish.

I haven’t really modified Zsuzsa’s recipe, but slightly changed the amounts. I found it simply perfect, especially the addition of garlic which doesn’t always figure in other Hungarian recipes. This lecsó is light and low-fat (just like Stuffed Peppers) and proves that Hungarian cuisine doesn’t have to be heavy and greasy (I know some people think this). Make sure you cook more than you think you’ll eat because the smell and the taste are so irresistible, second helpings have absolutely to be included in your estimates. Thank you, Zsuzsa, for this amazing recipe.

TIPS: Zsuzsa doesn’t peel the tomatoes and I couldn’t decide whether I should peel them or not (I usually do when cooking tomatoes). Finally I peeled half of the tomatoes, but next time I will not peel them at all. The skin adds more flavour. I know that some people have problems with tomatoes skin, so if you are one of these, peel all the tomatoes.

If you want your lecsó hot, add some hot chili powder (see below). Otherwise you can use only sweet paprika.

Preparation: around 1 hour

Ingredients (serves 2, with second or third helpings):

6 medium tomatoes

6 long yellow peppers

2 long red peppers

4 tablespoons oil (I used duck fat instead)

1 onion

4 garlic cloves

3 tablespoon sweet paprika (I have put 1 tablespoon hot paprika and 2 tablespoons sweet paprika)

salt, pepper

(300-400g smoked sausages (sliced) or 4 beaten eggs)

Peel the garlic and chop it finely.

(If you want to peel the tomatoes, put them in boiling water for a minute. Take them out with a slotted spoon and put into cold water. Peel them.) Chop the tomatoes roughly.

Core the peppers, remove the stalks and cut them into slices.

Chop the onion and fry it in fat until soft and translucent.

Remove from the heat, add the remaining ingredients.

Simmer covered until the peppers are soft, checking if you need to add more water.

If you want to serve it with sausages, I strongly advise frying or grilling them before. Then slicing them. It gives much more taste to the lecsó. Add the sausage slices, cook for 10 more minutes and serve.

If you want to serve it with eggs, beat the eggs in a bowl and simply pour them into the pan with lecsó, stir a bit and serve when the eggs are set.


Hungarian Stuffed Pepper, or Töltött paprika

stuffedpepperpI have an extremely kind friend, who regularly visits her family in Hungary and who brings me local delicacies, such as sausages, hot sauces and… peppers. Yes, genuine raw Hungarian peppers! (If you have never had the pleasure to taste or at least to smell them, they have a unique, unequalled, enticing aroma you will never experience if the same variety is grown elsewhere). A couple of days ago my friend has made me a huge surprise bringing a huge bag of hot and sweet Hungarian peppers, given by her mum, who is not only an excellent cook, but also a particularly generous and kind person. Thank you again A. and thank you so much Mrs. J.!

When I opened the bag, the typical, extraordinary aroma filled the whole kitchen. The hot peppers were pickled (see here my Pickled Hot Peppers recipe) and placed in a “VIP” sector of my pantry.  As for the sweet ones, I have planned several dishes, the first of which was töltött paprika (stuffed pepper). I thought that the generous present I was offered was not only an occasion to cook Hungarian, but also to post once more the recipe I wrote about a long time ago, so do not be surprised to find it in my old posts.

Töltött paprika (stuffed pepper) is a very common dish prepared with long sweet peppers, usually very light yellow (usually the “cecei” variety) and often called  ”TV paprika” (short for “tölteni való paprika”, meaning “peppers for stuffing”), the variety I was offered. (Their name shouldn’t be mixed up with a Hungarian food channel called tvpaprika where of course “tv” means… tv.) Stuffed peppers are usually served with potatoes, but I find it somehow too rich for hot summer days, so I simply like to have it with good baguette. If prepared with lean pork and if the sauce thickening stage is skipped, töltött paprika is a healthy, light dish, contrary to the stereotypical image of the Hungarian cuisine. Since I have never tasted stuffed peppers made by a Hungarian cook, I’ll not even try to pretend mine are similar to THE original. All I can say is the smell is amazing, the taste crowd pleasing, the recipe simple and easy; in short the quintessence of good home food.

My main modifications of one of the basic recipes, taken from Szakàcskönyv by Ilona Horvàth (the classic “every housewife” cookbook I bought during my trip to Hungary), are numerous. First of all I always have it with sour cream or milk and my Hungarian friend loved it this way too, but I have been told the majority of Hungarians don’t add it (thank you, K.). Browsing through Hungarian food websites I found celery or celeriac addition excellent idea, I also added dried sweet paprika to the stuffing and omitted the egg in it, as well as the roux (mixture of flour and butter or other fat, fried a bit and then added at the end of cooking to thicken the sauce), since I skip it in my sauces whenever I can. The sauce is light, healthy (cooked tomatoes or tomato sauce are supposed to have more lycopene than raw tomatoes) and the whole dish irresistible.

TIP: Of course if you don’t find the Hungarian pepper variety, this recipe can be prepared with any sweet, long peppers.

Preparation: 1h30min

Ingredients (serves 4):

8-10 long yellow sweet peppers (or other long peppers)

300 g ground lean pork 

80g rice

1 litre tomato sauce or canned tomatoes

(tomato paste)

2 onions

5 branches celery or celeriac leaves/ 1 celery stalk/half of a small celeriac cut into pieces

(1 tablespoon dried sweet Hungarian or Spanish pepper)

salt, pepper

1 teaspoon sugar

(sour cream or sour milk)

Put the tomato sauce or tomatoes, the celery stalk or branches, 1 halved onion and the sugar into a big pan (big enough to contain all the peppers). Bring it to boil, lower the heat and simmer for a couple of minutes. (You may add the tomato paste if you think the sauce is bland).

In the meantime chop the remaining onion finely, mix with the meat, the rice and the dried pepper. Add some salt and pepper to taste.

Cut off the pepper stems (do not throw away the pepper flesh you had to cut off with the stalks! I usually cut them up and put into the tomato sauce), discard the seeds. Stuff them (leaving 1/2 cm empty from the top) with meat mixture. Since the rice will swell, you have to make some space in the peppers.

Take a wooden spoon handle (or your finger) and make a tunnel in the centre of every stuffed pepper.

If you have any leftover stuffing, form small meatballs and cook them together with stuffed peppers. Put the peppers and the balls delicately into the tomato sauce (it should cover them) and add some water if needed.

Cover it and let it simmer on a moderately low heat for at least one hour.

Check from time to time if they don’t stick to the bottom of the pan.

If you stir the sauce, do it carefully, as the peppers become very fragile.

Traditionally, in Hungary this dish is apparently served with boiled potatoes. I serve it simply with good crunchy bread.

Even though apparently it’s not a traditional way, I love this stuffed pepper served with a big dollop of sour cream/milk.

Székely Gulyàs, or Hungarian Pork and Sauerkraut Stew

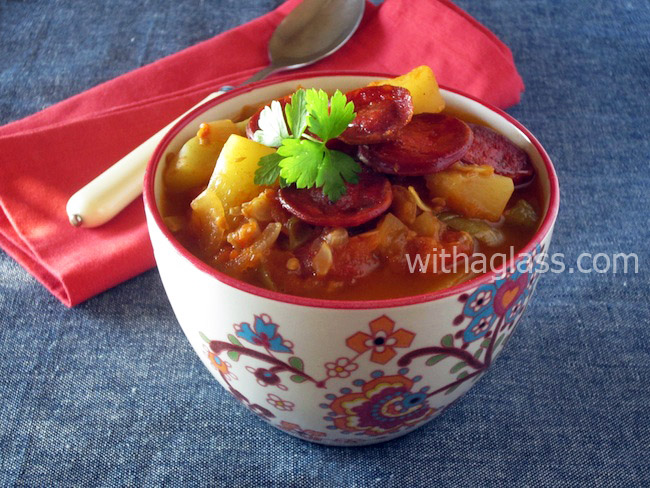
Sauerkraut, or sour cabbage, has been made in Europe for centuries, ensuring the precious vitamin C and other nutrients during the Winter. Thinly sliced, fermented cabbage is used in a variety of hearty dishes or eaten uncooked in pleasantly tangy salads. Even though it’s not my daily fare, I like both raw and cooked sauerkraut and usually start seriously craving it when it gets colder. Thanks to Kelly (Inspired Edibles) I know now that sauerkraut’s lactic acid bacteria enhance my natural immune system. Thank you Kelly for your professional remark!

Some people are put off the sauerkraut and are afraid even to taste it mainly because in many countries (like France or Switzerland) it is served as a disgusting undercooked, under-seasoned heap, with sausages and fatty pork cuts. Low-fat, spicy and aromatic, Székely Gulyàs is the exact opposite. When I first saw it browsing through Zsuzsa’s recipes (Zsuzsa is in the kitchen) I instantly knew I would love it as much as all the Hungarian dishes I had tasted or cooked.

Székely Gulyàs (pronounced “see-cay goo-yash”) is thicker than the famous gulyàs and there is a doubt about the “székely” name. Some people say it comes from an ethnic group called “Székely”, who still lives in the present Romania, others – like Kàroly Gundel, a famous Hungarian cook- say it was named after a writer Jozsef Székely, whom Gundel calls the “godfather” of this stew. Apparently traditionally Székely Gulyàs called for three kinds of meat, but now people use only one. Whatever the origins and history, this is a perfect dish for cold days: hearty, but low-fat and with the enticing aroma mainly due to the Hungarian sweet paprika. It is traditionally served with sour cream, but I find it equally delicious with thick sour milk I replace sour cream with.

I have slightly simplified Zsuzsa’s recipe, omitting the oven baking stage, but in spite of these changes, my Szekély Gulyàs was excellent. Thank you, Zsuzsa for one more delightful Hungarian culinary discovery!

TIPS:

Like many stews, this one gets at least twice as good when reheated the following day. Actually it improves every time it’s reheated.

Do not throw away the liquid drained from the sauerkraut. You can add it during the cooking process if you feel your dish is not tangy enough. Personally I love my sauerkraut dishes very tangy, so I don’t even drain the liquid most of the time.

Preparation: about 2 hours (but it’s definitely best reheated the following day)

Ingredients (serves 2):

300 g lean pork

1 teaspoon caraway seeds

1 small onion

1 big garlic clove

300-350 ml sauerkraut (raw, not cooked)

3 tablespoons Hungarian sweet dried paprika (

(1 tablespoon hot Hungarian paprika)

1-2 tablespoons oil

sour cream or milk

salt, pepper

Drain the sauerkraut, but don’t throw away the liquid (see the TIP above).

Cut the meat into bite-sized pieces.

Chop the onion and the garlic.

Fry the onion until soft.

Add the meat and fry it until golden brown.

Take the pan from the heat, add the spices and the garlic, 125 ml (1/2 cup) water.

(Add hot paprika to taste or skip it if you don’t want a fiery dish.)

Lower the heat and simmer the meat covered for one hour.

Take off the lid, add the sauerkraut and some more hot water to cover the whole dish.

Continue to simmer first uncovered, then, after 30 minutes, covered for about 1 hour in total.

Serve immediately with a splash with sour cream or sour milk or let it cool down, refrigerate overnight and serve it reheated the following day.


Damson Plum Butter

Damson Plum is the queen of all the plums and Damson Butter is the king of all the fruit butters. Even though a palatable fruit butter (in other words a very thick jam) can be made practically with every fruit (or even fruit skins, as I realised only last week), damson butter is unique. Damson, Damson plum, or Damask Plum (Prunus domestica subsp. insititia) is oval with a very dark, violet skin, yellow flesh and has a very long history. Its name comes from “prunum damascenum” (plum from Damascus), since it was apparently first cultivated in antiquity in the region of Damascus. I don’t know about the rest of Europe, but it was introduced to England by Romans.

If you think you might have never spotted a damson on a tree or on a market, you must have seen its picture on a bottle of damson brandy called slivovitz, slivovitza, šljivovica, rakia… and produced in several central-European countries, such as Poland, Serbia, Hungary or Slovakia. For me the most aromatic and flavoursome comes from Serbia.

Just like damson brandy, damson butter is a part of long culinary traditions of certain countries. Even the smallest grocer or supermarket in Poland, Hungary, Slovakia or Germany carries damson butter (powidła, lekvàr, mus…), while a standard damson jam might be impossible to get there. If you want to know why, try making a “standard” jam with damsons, and then prepare the damson butter. I have made the the normal jam only once in my life and will never do this again.

Contrary to all the jams or fruit butters I know, properly made damson butter requires only plums and a bit of water. No sugar. This is not my invention of a low-sugar fruit preserve, but a genuine, traditional way of making damson butter. (By “no sugar” I mean no sweetener such as apple juice, often found in sugarless jams). The real damson butter is cooked on a very slow heat for many hours divided in two or three days. Thanks to this long and slow cooking process it keeps in a pantry for long years. I have recently opened a 5-year-old jar and it was perfectly sealed and preserved.

Damson butter has a concentrated fruit taste, with a slightly tart note. It is perfect as a filling for tarts, cookies, biscuits or as a layered cake spread. Thanks to its tanginess it’s also excellent in savoury dishes: with roast pork, chicken, turkey, smoked bacon, in sandwiches, on pancakes, crêpes, with terrines, pâtés, foie gras… In short, this is the only fruit jam I cannot imagine my life without.

Damson butter making process is not difficult. No peeling is involved and stones go out quite easily. It requires however a certain patience and a big batch of fruit; don’t bother if you have less than 3 kg, since the yield is quite low.  Thus, if you have 5 kg plums, you will obtain only 1,5 – 2 l fruit butter. Everything depends of course on the damsons’ quality, skin thickness and cultivation methods. On the other hand, when buying a big box of fruit, you often obtain a substantially reduced price.

I have been making damson butter for many years and can assure you all the effort, time and money spent are definitely worth it.

NOTE: even if you have very ripe plums, the final butter might prove very acid. You can add some sugar, but only at the end, when the thick consistency is obtained and usually it is no more than 10% of the initial fruit weight. Do not add the sugar earlier, since it might make the butter burn easier.

Preparation: about 10 hours (divided into 2-3 days)

Ingredients (yield: about 1,5 l):

4 kg damsons

water

(sugar)

Wash the plums, stone them and put in a big pan.

Add some water (about 10% of the fruits’ initial weight), so that they don’t stick to the bottom until they start releasing their juice.

Put the pan on a low heat and let it simmer, stirring occasionally. First you can stir every 30 minutes, but when the mixture thickens, you should lower the heat to the absolute minimum and stir it every ten minutes. The thicker the mixture,  the more often you should stir it.

If the pan burns, quickly transfer the unfinished butter to another pan (otherwise it will “take” the burnt flavour).

The butter is ready when you put a wooden spoon in the middle and it doesn’t move.

When you obtain this final consistency, taste the butter. If you think it’s too acid, add sugar, let it simmer, constantly stirring and continue adding sugar and stirring until the required sweetness is obtained and the sugar is dissolved.

Some damsons might seem very sweet at the beginning, but at the end the butter might come out too acid.

If you had ripe plums normally you shouldn’t add more than 10% of sugar compared to the initial fruit weight. (I have never added more than 10% of the final butter weight).

Don’t add sugar before the final, very thick consistency is obtained.

/At this point you can either freeze it (after the butter has cooled down) or keep it in the fridge for a couple of weeks, or process it in the jars, as described below, and store it in your pantry for several years!/

Pour the butter, still hot, into sterilised jars. Cover with lids. Leave the jars to cool.

Place the cool jars in a big pan, bottom lined with an old kitchen towel folded in two (this will prevent the jars from breaking), cover up with hot – but not boiling – water to the level just below the lid. Bring to boil and keep on a very low heat, in simmering water, for around 20 minutes.
Stick on self-adhesive labels, write the name of the butter and don’t forget to mark the date.

NOTE: For the readers who live in the USA, the USDA-approved canning method is different. You can find it described here:
http://www.uga.edu/nchfp/publications/uga/using_bw_canners.html.

Damson Plum Butter on Punk Domestics

Gerbeaud (Zserbó), or Walnut and Apricot Layered Cake

I would like to proudly announce my accomplishment of gerbeaud, the very first layered cake in my life and one of the monuments of the Hungarian cuisine. Even though at first sight it doesn’t look unusual, gerbeaud (pronounced “jer-bo”, “j” sounding softer, like in “je ne sais quoi”) clearly stands off in the layered cakes family. In fact, instead of being cut after baking or being baked int batches, the layers are assembled with the filling beforehand. This difficult and meticulous method creates a very surprising and complex flavour, which, after the black chocolate topping is added and the cake cooled, gets to a mysterious point where one would swear there is a subtle coffee taste… Gerbeaud is very filling and rich, but doesn’t have the usual sickening sweetness or greasiness of birthday or wedding layered cakes, while apricot jam, as usually, gives it a tangy kick.

Emile Gerbeaud, the creator of this cake, was a Swiss confectioner, who arrived in 1889 to work as a partner in a famous Budapest café, which he overtook and which is nowadays called “Gerbeaud”. Zserbó szelet (literally “gerbeaud slice”) is now firmly established as one of the Hungarian classics. Sold in local cafés, pastry shops and also quite popular among the brave home cooks. It requires long experience to look as neat as on the Gerbeaud café’s website…

This recipe comes from Zsuzsa is in the kitchen blog, where I have previously found (and successfully tested) several delicious Hungarian recipes. Her version, as well as many others I have seen on the web, calls for three pastry layers and this is the version I stuck to for the first time (yes, actually I did it twice!), obtaining a rather surprisingly neat result. Then, I felt particularly bold and attempted a four-layered version (on the photo above). Both cakes were delicious, the latter being much more difficult. It looked messier, but was very moist.

Since this is a “monument cake”, no ingredient substitutions are allowed. Otherwise, it doesn’t have the right to be called “zserbó”. I have increased a bit the filling ingredients amount and prepared the dough in the food processor (instead of hand kneading).

(By the way, here maybe I’ll break the historic aura surrounding gerbeaud, but it is an excellent way to use up previous year’s surplus or an open jar of apricot jam…)

Preparation: 2 hours + cooling + one night in the fridge

Ingredients (for a 20 x 20 cm baking dish, at least 4 cm high):

Pastry:

320g flour

180g butter

40g sugar + 1 teaspoon

pinch of salt

1 egg

1 1/2 teaspoon dry yeast

3 tablespoons warm water (not hot!)

Filling:

1 jar of apricot jam (normally it should be sieved or mixed, but personally I appreciated whole bits of fruit…)

150 g ground walnuts (freshly ground and moist taste better)

Topping:

70-100g bitter chocolate

40 g butter

Combine the yeast, the warm water and 1 teaspoon sugar.

In the meantime mix the flour with the butter until fine crumbs are created (or do this with your hands).

Add the yeast mixture, the egg, a pinch of salt, 40g sugar and mix or knead until you obtain a smooth dough.

Divide it into three or four equal parts. Form them into balls, place in a big bowl and cover.

Leave them for 15 minutes.

Line the baking dish with baking paper, leaving it hanging a bit on at least two sides (it will be easier to remove the baked cake).

Sprinkle a rolling pin and the rolling surface with flour. Roll out the first ball into the baking dish’s dimensions. (Here my friend A. gave me a very simple trick consisting of placing the baking dish next to the rolled out pastry, first in height and afterwards in width. Then you simply cut out the square with a knife).

Transfer the rolled out and measured layer delicately and put on the bottom of the dish.

Spread it with some apricot jam and sprinkle with walnuts.

Repeat the operations, finishing with a layer of pastry. (If you have four pastry layers, there should be three filling layers).

Cover the cake and put aside for 30 minutes.

Preheat the oven to 180°C.

Bake the gerbeaud for 30-40 minutes until golden.

Remove it from the oven and let it cool down completely.

Melt the chocolate and the butter.

Turn the cake upside down (the bottom is neater so the top surface will be neater too, I found this idea on the Hungarian desszert.eu website) and put back into the baking dish with the baking paper.

Spread the chocolate – butter mixture on the cake and put it into the fridge.

Serve cut into rectangles.

Curd Cheese Biscuits (Túrós Pogácsa)

pogacsap

These clumsy, innocent-looking biscuits have long been the biggest culinary nightmare of my life. In short, every single attempt to reproduce these Hungarian delights called pogácsa (pronounced “pogatcho”) ended up in a complete failure. Thus, throughout the years and numerous experiments, I have never managed to make anything palatable. Until yesterday, when, encouraged by Zsuzsa’s (Zsuzsa is in the kitchen) kind advice, I could present a highly satisfactory batch of túrós pogácsa (or curd cheese biscuits).

According to Wikipediapogácsa” derives from the Latin “panis focacius”, a name given in acient Rome to bread baked in the ashes. “Pogača” or “pogacha” is a like – sounding bread from Bosnia and HerzegovinaBulgariaCroatia,MacedoniaSerbiaMontenegro and ”poğaça” from  Turkey . The same Latin name gave also birth to “fougasse” and “focaccia”, French and Italian flat breads. In Hungary pogacsa are eaten as snacks or appetizers and can be bought practically at every baker’s. They have different sizes, textures and varieties. They can be made with pork cracklings, sour cream, potatoes, hard cheese, curd cheese (sometimes called “farmers cheese”)… The latter is my favourite version, somehow lighter and more complex. When leavened and layered, they have are light, delicate, situated somewhere between the crumbly puff pastry and soft, moist rolls’ texture.

Following Zsuzsa’a advice I looked for a new Hungarian recipe and finally have ended up with a mixture of what I found on this Hungarian website and the Zsuzsa’s advice. The curd cheese (available in Polish or Russian shops, I have written here a bit about the curd cheese) can be substituted here with drained cottage cheese. Thank you, Zsuzsa, for your encouragement and advice.

Special equipment: a small biscuit cutter (or a very small sharp-rimmed glass to cut out the biscuits)

Preparation: 1h30

Ingredients (about 40 x 4 cm diameter biscuits):

250 grams flour

250 grams curd cheese (or cottage cheese with whey removed)

250 grams softened butter

7 g dried yeast

2 flat teaspoons salt

1-2 yolks

1 egg

(grated hard cheese or/and coarse salt)

Combine the flour, the butter (cut into small pieces if cold), the curd cheese, the yeast and the salt. Knead it for about 10 minutes (I have put it my food processor, kneading function). Form a big ball, put into a plastic bag and let in the fridge for 20 minutes. Heat the oven to 200°C. Roll the dough very thinly, brush with egg yolk. Fold in two pieces, brush it once more. Repeat this operation twice more. The pastry should be 1-1,5 cm thick. Cut out the biscuits, put them on a baking sheet, brush with a slightly bitten egg and sprinkle either with coarse salt or with grated cheese. Put them aside for 10 minutes. Put them into the oven and bake for 20-30 minutes until golden.

Hungarian Stuffed Pepper, or Töltött paprika


I have recently been offered beautiful Hungarian peppers. They arrived straight from Budapest in my very kind friend’s – also very kind – parents’ luggage. Their intense aroma kept me smelling them throughout the days. They were absolutely delicious prepared fresh and I felt so sorry to see them disappear… Thank you A.! And thank you Mrs J.!

Most of them ended up pickled and in stir-fried Asian dishes. I decided however I couldn’t simply say goodbye to such a rare treat without making a Hungarian dish! Töltött paprika (stuffed pepper) is a very common dish (and one of the few Hungarian dishes I have ever made), prepared with long sweet peppers, usually very light yellow (usually the “cecei” variety) and called  ”TV paprika” (short for “tölteni való paprika”, meaning “peppers for stuffing”, but the funny thing is I have recently discovered a Hungarian food channel called tvpaprika!). My peppers were light yellow, long and… Hungarian, in short “TV paprika” ! Their fate was set.

Stuffed peppers are usually served with potatoes, but I find it somehow too rich for hot summer days, so I simply like to have it with good baguette. If prepared with lean pork and if the sauce thickening stage is skipped, töltött paprika is a healthy, light dish, contrary to the stereotypical image of the Hungarian cuisine. Since I have never tasted stuffed peppers made by a Hungarian cook, I’ll not even try to pretend mine are similar to THE original. All I can say is the smell is amazing, the taste crowd pleasing, the recipe simple and easy; in short the quintessence of good home food.

My main modifications of one of the basic recipes, taken from Szakàcskönyv by Ilona Horvàth (the classic “every housewife” cookbook I bought during my trip to Hungary), are numerous. Browsing through Hungarian food websites I found celery or celeriac addition excellent idea, I also added dried sweet paprika to the stuffing and omitted the egg in it, as well as the roux (mixture of flour and butter or other fat, fried a bit and then added at the end of cooking to thicken the sauce), since I skip it in my sauces whenever I can. The sauce is light, healthy (cooked tomatoes or tomato sauce are supposed to have more lycopene than raw tomatoes) and the whole dish irresistible.

Preparation: 1h30min

Ingredients (serves 4):

8-10 long yellow sweet peppers

300 g ground lean pork

80g rice

1 litre tomato sauce or canned tomatoes

(tomato paste)

2 onions

5 branches celery or celeriac leaves/ 1 celery stalk/half of a small celeriac cut into pieces

(1 tablespoon dried sweet Hungarian or Spanish pepper)

salt, pepper

1 teaspoon sugar

sour cream

Put the tomato sauce or tomatoes, the celery stalk or branches, 1 halved onion and the sugar into a big pan (big enough to contain all the peppers). Bring it to boil, lower the heat and simmer for a couple of minutes. (You may add the tomato paste if you think the sauce is bland).

In the meantime chop the remaining onion finely, mix with the meat, the rice and the dried pepper. Add some salt and pepper to taste.

Cut off the pepper stems (do not throw away the pepper flesh you had to cut off with the stalks! I usually cut them up and put into the tomato sauce), discard the seeds. Stuff them (leaving 1/2 cm empty from the top) with meat mixture. Since the rice will swell, you have to make some space in the peppers.

Take a wooden spoon handle (or your finger) and make a tunnel in the centre of every stuffed pepper.


If you have any leftover stuffing, form small meatballs and cook them together with stuffed peppers. Put the peppers and the balls delicately into the tomato sauce (it should cover them) and add some water if needed.

Cover it and let it simmer on a moderately low heat for at least one hour.

Check from time to time if they don’t stick to the bottom of the pan.

If you stir the sauce, do it carefully, as the peppers become very fragile.

Serve with the sauce and a big dollop of sour cream.

Traditionally, in Hungary this dish is apparently served with boiled potatoes. I serve it simply with good crunchy bread.